Material: Cut Paper/Bristol Board
Objective: Using communicative shapes, tell the story of your intersection.
______________________
Of all the intersections I could’ve chosen, I picked the one on the other side of the Monongahela River, a 34 minute bus ride away consisting of a confusing bus transfer, infuriating Pittsburgh traffic, and the nuisance that is Google Maps.


The intersection was busy and noisy; bright red, yellow, and green buses rumbled under the rusted, metal bridge, and the gears and wheels of decades-old trolleys screeched along the corroded rails. Impatient car horns blared, and exhausted car engines sputtered across the fading paint of the crosswalk.

I also noticed the amount of construction at this intersection—defined by obnoxiously orange detour signs and vandalized “Do not Enter” signs. The cracked ground featured the scribbles of measurements in pink and green spray paint, as well as disintegrated cigarette butts, plastic bags, and a stained coffee cup.


The majority of people populating the intersection appeared to be in their 20s to 50s, determinedly crossing the road while scrolling on their phones, carrying backpacks, lunch boxes, and briefcases. I assumed they had just got off work and were heading home, because they were all coming from the major train station next to the cliff. Many bikers also crossed the intersection, a quick detour on their bike path next to the waterfront.


The Second Visit — 8.31.19
After our first class discussion, I learned how the composition, cropping, contrast, point of view, etc. can impact my photos to tell a story. I also learned about the importance of telling the specific story of Smithfield and E.Carson, not another intersection. Some of my photos from my first visit were generic and uninteresting—pictures that could be from any intersection in Pittsburgh.


When I returned to my intersection, I explored a little further than just the crosswalks, road signs, and stop lights. I explored the train station, trolley tunnel, bus stops and noticed that this intersection was a small detour to the Monongahela Incline for the many tourists.


All of my previous photos were static; on my second visit, I wanted to focus on the movement and action at my intersection. I photographed the families, children, and couples crossing the roads to ride the incline, as well as the people waiting at the bus and train stations.


By observing the people, I can capture the spirit and mood of my intersection, and better understand the overwhelming chaos and energy caught between Smithfield and E. Carson.


White-on-White Paper Cut
After our class discussion on Tuesday, I was unsure of what photo to use for the white-on-white project. I realized that many of my photos from my second visit focused on the people instead of placing an equivalent emphasis on the place; the people are a part of the intersection, but they should not be the primary focus. I also learned that my photos of the Amish family were not representative of the intersection; it’s not an everyday scene that a traditionally-dressed family crosses Smithfield Street.

I chose to use this photo because Station Square station is an iconic landmark of the intersection. The photo represents the transportation and urbanization of the area; the people crossing the streets were tourists going to the Incline or middle-aged adults boarding the train after work. I also thought this picture defines the sounds I heard at the intersection: the screeching of the trolley’s rusted, metal wheels against the rail, and the obnoxious horn of the train as it enters the tunnel.
The White-on-White Process
Trial 1


To create this project, I printed many copies of my photo at the 6 x 8" size. I started by cutting out the background: the train station and the trees. I cut out the silhouettes of the elements I needed from the original photo, and then flipped it backward and traced it on my Bristol board so that the cut piece wouldn’t have pencil markings.
After cutting out the background and railways, I started to cut out the arches. This was difficult because I wanted to create the same sense of depth and perspective in the photo, so I had to make sure the arches in the background were thinner than the ones in the foreground.
One of the last steps was to cut out the electrical wires. I wanted to include them because they lead the eye through the archways into the scene.

Trial 2
After the critique, I wanted to redo the train tracks because the curve in the back wasn’t accurate and made the tracks look fake and almost “squishy.” My original photo was too dark to see the details of the tracks, so I made the journey back to the intersection to take a better photo.

The method I used in Trial 1 of cutting shapes out the original picture worked well, so I decided to use the same method again. In Trial 2, however, I focused a lot on the details and curves of the tracks, particularly the bend in the back. I had to redo the train tracks multiple times, especially because the thin curves in the background were difficult to cut.


I also added a few more electrical wires because I liked how they led the eye through the arches in the first white-on-white project.


The Gray Tone PaperCut
The Gray Tone Process
I tested different tonal compositions by printing out my white-on-white project and color blocking the different shapes. I had a lot of trouble simultaneously trying to demonstrate depth with the arches, trees, and train tracks while making sure each shape was distinguishable. I attempted a light foreground and dark background, and vice versa, and decided that I liked the darker foreground better. However, I still had trouble with the trees, because I wanted to make each tree a different color, but this clashed with the tones of the arches. After testing out more layouts, I realized that my composition didn’t have to be so systematic, where everything in the background must be the lightest shade and everything in the foreground the darkest shade. I decided to make all the trees the darkest shade, so that the arches stood out against the dark trees.

My next challenge were the tracks — I wasn’t sure if I wanted to make each “train track block” a different color to show depth, or if I should make a gradient with each track. I then decided that the perspective and curves of the tracks were enough to demonstrate depth, and that I didn’t need to use color to simultaneously show depth.


When cutting the paper, I decided to use a different method than my white-on-white paper cut in which I traced elements of the original picture onto the bristol board. I tried using tracing paper this time, and found that it was a lot easier to capture the precision of the track’s curves. I would trace the elements of the intersection I needed from the original photo, and then use it as a stencil onto the Gray Tone paper.

After the critique, I realized that the contrast between the white and dark brown in the crack in the foreground stood out a lot, and in the original photo, the crack isn’t as prominent. The man walking also drew viewer’s immediate attention because of the stark contrast in tone. Therefore, in my edited gray tone, I laid a mid-tone shade of brown in the crack, and took out the walking man.

The Color PaperCut
Using color in the intersection was the most difficult, because I wasn’t sure what I wanted to emphasize: the arches, the tracks, the electrical wires, or the train station in the back. Using Photoshop, I tested multiple color studies:


The colors orange and yellow stood out to me, but I still didn’t know what elements of the intersection I wanted to emphasize. Looking back upon my notes, I noticed that one of the most significant sounds I heard were the rusted metal wheels of the trolleys screeching along the metal rails, and the curving lines of the tracks were a crucial visual element to my composition. Therefore, I decided to highlight only the train tracks with my color.
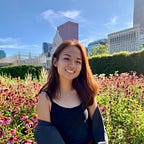
Choosing the Color
The next step however, was choosing my color. I played around with laying the colors in the sky, arches, and train tracks, but each time, the yellow color would immediately catch my attention because of its vibrancy and potency. When I asked my classmates what their initial impressions and feelings were when they saw the bright, yellow sky, their response was that it made them feel good and optimistic. I ultimately decided upon yellow as my color because it captures the excitement and energy of the intersection as families cross the streets to ride the incline or go shopping, and resembles the visual brightness of the sun reflecting off the iron arches. I decided to place yellow as the sky because I believe it highlights the arches and electrical wires, while also setting the playful and buoyant mood for the piece. The red sky was far too dramatic and intense, and the green and orange skies didn’t match the mood I wanted; I took out my yellow paper and began to cut.


The Color Process

I used a mix of the tracing paper method from my Gray Tone Process, as well as the “cut-from-original-and-flip-backwards-and-trace-on-real-paper” method from the White-on-White Process. I realized that with a colored background, I needed to add many more layers such as the white and light brown backgrounds around the tracks.


After so many iterations of this intersection, this last colored copy was easier but also more challenging. It was easier in that I knew the process to go about cutting the elements—which elements to cut and glue first—and it was harder in the layers of the colored paper.


The Final Projects