COMMUNICATIONS MINI FALL 2020 | PROJECT III
To explore typesetting, we are to create a two-page spread that introduces the reader to our selected typeface. I chose Clarendon because I was immediately attracted to its thick, bold serifs and playful ball terminals.

Research
We were to write a one to two page essay that highlights the history, usage, and unique characteristics of the typeface (Clarendon), and a brief statement (50–65 words) summarizing the essay.


Key Research Points:
History
- Created in 1845 by Robert Besley for the Fann Street Foundry in London.
- In the 1840s, slab serifs were gaining popularity but were often lumpy and poorly matched to the body text face they were intended to complement.
- Therefore, Clarendon was designed as a “related bold”—a typeface meant to harmonize and align with other roman types
- Clarendon was the first typeface to be patented.
Characteristics
- Introduced thick, bracketed serifs—gentile curves that widen to connect the serif to the body of the letter, providing ease of readability and visibility, as well as a softer and more approachable feel.
- Curled leg on “R”
- Ball terminals on “a” and “c”
- large x-height
- short ascenders and descenders
- low contrast
- Display type
- Five weights—light, roman, heavy, bold, black
Context/Usage
- Posters printed on wood type
- “Wanted” posters of the American Old West
- National Park traffic signs
- Sony, Wells Fargo, Tonka, Ruby Tuesday logos are all variations/inspired by Clarendon.
“The most useful founts that a printer can have in his office are the Clarendons: they make a striking word or line either in a handbill or title page, and do not overwhelm the other lines. They have been made with great care, so that while they are distinct and striking, they possess a very graceful outline…”
— Printed in Fann Street Foundry’s 1873 Type Specimen Book
Adjectives:
Clarendon’s association with nature (wood type, national park signage) gives the typeface a feeling of warmth and hand-craftsmanship that comes with a comforting timelessness. Its’ thick square serifs are bold, confident, and sturdy, yet the soft curves of the brackets are gentle, approachable, and charming.
- Bold, Striking
- WOOD, “Wanted”
- Timeless
- Playful
- Handcrafted
- Vintage
- Approachable
- Versatile
Analyzing the Typeface
With some background knowledge on Clarendon, I decided to do some analogue analysis on the typeface to apply what I researched.


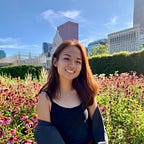
I identified the short descenders and ascenders, tall x-height, drop ears on the “r,” bracketed serifs, and vertical stress.

I noticed the upturned foot on the “a” and “R” and the low contrast across the letters, allowing for ease of legibility. I also examined the typeface across its five different weights, noticing the increasing thickness and decreasing tracking.


I then explored type pairings for Clarendon for my body text. Because Clarendon is a slab serif, I thought it would pair well with a sans serif font. I experimented pairing Clarendon with Trade Gothic, Neue Haas Grotesk, Freight Sans, and InterFace. I also tried out some serif fonts: Minion and Garamond. I’m a little unsure on which to use, but I do kind of like Trade Gothic.

Thumbnail Sketches
Because the letterforms of Clarendon are so unique and elegant, I focused a lot of my initial thumbnails figuring out how I could create dynamic and informative imagery by highlighting the different quirks of each letter. I played around with scale, breaking the margin, and other playful compositions. I knew I wanted to highlight these key characteristics: the upturned foot of the “R,” the ball terminals, and the bracketed square serifs. I also tried to experiment with layouts using images, but I found it pretty difficult to place on the spread when I didn’t have any images in mind for reference.
In one of my sketches, I had the idea of creating a “WANTED” poster for Robert Beasley and Clarendon. I don’t think I’ll be ultimately going with that idea… but I just really wanted to try it.

Laying it Out in Digital

I found it pretty difficult creating my letter imagery, especially trying to find the balance between too cluttered and not informative enough…
In the bottom right corner, I recreated my Wanted poster design, taking inspiration from the strikingly obnoxious American Old West posters. I noticed a lot of the posters used these sketch-y hand pointer drawings, and I’m interested in exploring imagery in that wood print, etching, linocut style because it communicates the handcrafted and western feel I’m looking for.


Proportion & Layout Harmony
Vicki taught us how to use our letterforms to guide and inform our spread proportions. We learned how to use the x-height and cap-height of our letterforms to influence the placement and size of our text and images. I revisited some of my layouts and explored setting the type guided by Clarendon’s wide, stocky letterforms.


Imagery
Because Clarendon’s letterforms already have so much personality and ~quirkiness~ to them, I wasn’t sure if I wanted to incorporate any photos. I still wanted to give it a try though, so my first instinct was to look for “cowboy,” “Old Wild West,” “American Western” artwork. I found a lot of dynamic and energetic paintings of American cowboys and horses, but I wasn’t too sure how to incorporate them into my spread.

The second style of imagery I looked for were historical illustrations of the Old West, since Clarendon was created in 1845. These were pretty difficult to find (and at a high enough resolution), but I really enjoy the hand-crafted and vintage feel to them.

I was pretty lost on which direction to take my spread, or which thumbnails—if any—were even good enough to move forward with. And sooooo… I scheduled a meeting with Vicki!
Meeting W/ Vicki:
- Using the letterforms to create imagery could be more interesting than using a photo.
- Cowboy imagery is a little overkill, and doesn’t match the “modern” look of Clarendon. But, the colors are really nice to incorporate into the spread.
- Favorite thumbnail spreads are the big “R” and scattered letters that almost spell “Clarendon.” Except, big “R” spread spells “RAY,” try another letter combo that doesn’t create a word.
- Print out letters and cut and paste them to loosen composition up.
- Look into pamphlets and newspapers from 1845.
Cut & Paste Exercise

Taking Vicki’s feedback, I tried out the cut and paste exercise to see if I could make my compositions more expressive and unrestrained. I printed out different sizes and variations (caps and lowercase) of letterforms. It was actually really fun to mix and match the letters. I tried to create a more directional composition, as if the letters were thrown and scattering across the spread.


More and More Iterations…
The cut paper exercise helped a lot in adding movement to my spread. I played around with tilting letters, masking images, and bleeding across the spread and through the margins. I also played around with varying hanglines for my body text to add even more energy to the composition. I experimented with only using color in the bottom left spread; the color palette was inspired by the bold but somewhat “earthy (..?)” tones from the cowboy paintings I found earlier.

In-Class Feedback from Jaclyn
- Like the big “R” composition, especially the tilted type creates a really interesting composition.
- For the pull quote, like the placement above body text more, and like it more when words are all the same size.
- Rag needs improvement, maybe columns are too thin? Gutter is good size for ease of readability.
___________
With the deadline approaching A LOT SOONER THAN I ANTICIPATED 🤦🏻♀️🤦🏻♀️ I had to grind this spread out. I was pretty satisfied with the image and how it compliments “antiquated flair” in the pull quote, and I liked how the letters guided the viewers across the spread to the body copy.
I still had some experimenting to do with the other spread composition, (remember all the scattered letters?), so I created some iterations based on my cut paper scans. I varied the sizes of the letters more and tried to create a more “directional scatter” (in the second column, I wanted the letters to wrap from the bottom of the spread and guide viewers to the title). I also wanted to make the letters seem as if they were pushing across the spread into the body text, although I had trouble figuring out how to then fit all the body text.

I played around with my color palette, but I feel it looks a little too childish when used across all the letters (kind of reminds me of the alphabet magnets you put on the fridge). In the last spread on the right, I wanted to highlight the drop terminals and bracketed serifs, but I’m not too pleased with the final result (and I got a little lazy splicing all the letterforms).
Feeling stuck with how to apply color and take this composition further, I took a break and went back to iterating on the big “R” composition.
___________
I started to add color to this composition as well. When I think of “Wild West,” I immediately think of a burnt sienna, orange red color. Since my image and text are black and white, I thought the orange could look nice as a spot color. I also played around more with the tilt of the “R” and “g a.”

I felt like there was a lot of dead space in the center of the spread, between the “R” and body text, and above “clarendon.” I wasn’t sure if I should leave it as negative space, or fill it with something (I have the tendency of wanting to fill every empty space possible which is kinda bad).
In the left spread below, I played around with using circles as a motif throughout the spread (goes along with the drop terminals!). In the center spread, I made the “R” smaller and added a new “Q” letter. However, this created a trapped pocket of negative space right in the center of the composition. In the rightmost spread, I stacked the five weights of the typeface in the empty space, but I don’t think I really like how that looks.

Playing more with color, I explored setting the image behind the “R” and applying an orange overlay. However, I think the spread gets too busy, and the “R” doesn’t shine as much as on a white background.


I also played around with a “dark mode” color palette, but I think I still like the white background. The black background one reminds me of Halloween the more I look at it…


Meeting W/ Jaclyn
- Multiple colors isn’t necessary, just using the orange is nice.
- “Q” spread → pocket of trapped dead space in the middle of the spread. How can we activate the dead center space? The circle layout is kind of interesting…
- Maybe can experiment with adding orange characters?
- What is the upper right letterform? Looks like some pull bar. Maybe change to an “n?” Also kind of strange that it’s a solid color while others have an image.
- Orange bar to highlight the bracketed serif is a little muddy. (?)
___________
Moving to Indesign

I transferred some of my favorite layouts to Indesign to work within a grid. I played around more with the orange circle composition, and swapped in the letter “n” for the upper right corner. Instead of using the rectangle shape, I highlighted the bracketed serifs with subtle dashed lines and fills.

I felt like I was pretty close to my final, but I needed another pair of eyes for some final refinements.
Meeting W/ Vicki
- The image feels European, and not sure what it’s about. Maybe you can fill the empty space next to “R” with a little blurb of text explaining the image context.
- Readability is on point!
- Dashed line detail is nice but gets lost on screen, make a tiny bit thicker.
- For Clarendon title, add tracking to count for the spine of the magazine spread so the letters don’t get eat up in the middle.
- For pull-out quote, subtle change in weight seems like a mistake, change the color to an orange, or increase the weight contrast.
- Really like the playfulness of the tilted text that feels appropriate for Clarendon.
- Orange for the circle is too bright and attention-grabbing, maybe try a very light, off-white color.
- Include page numbers!

This meeting before the final crit was extremely helpful as Vicki worked with me on some final tweaks for my spread. The advice on making the circle a light off-white tint was especially game-changing because it completely transformed the too-cluttered, too bright layout with the orange circle. After making the edits, I was down to three top spreads…


I couldn’t decide if I wanted the circles or not. I felt like the circles gets a little too busy, but without them, it’s too empty. After going back and forth and thinking about it for waaaay too long, I decided to go with this composition for our final spread crit:

Final Crit:
Guest Critic—
1. “R” not bold enough? The image makes the “R” fall back into the composition.
2. Too much playfulness? Everything has that bouncy feeling so the playfulness competes with each other. Maybe make “Clarendon” title straight horizontal across spread.
Hannah—
1. Contrary to the guest critic, Hannah liked the subtle image knockout of the letters.
2. Pull quote is done nicely and feels comfortable.
After the critique, I played around more with using other images in the knockout, as well as making the “clarendon.” title horizontal across the spread. However, I think I still like my original final, so I’m going to go with that as my final final.
**See the next part of this project: Clarendon Typeface Video**