Objective: Using Subtractive (Foam), Additive (Clay), and Sheet (Paper) construction methods to translate the natural form of the sea shell, computer mouse, and a hybrid of the two.
Natural Form: Seashell
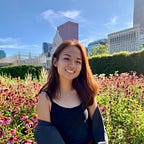
Images of Seashell (named Bailey) from various perspectives:


Sketches & Explorations

To better understand the nuances of my shell, I created multiple sketches in different perspectives, focusing on the curves, textures, and proportions. I also printed images of my shell into my sketchbook to make direct notes and measurements.
I found that my shell was 5.0 cm by 7.5 cm by 4.3 cm in size. Its primary body shape is a robust spherical shape which quickly, and steeply, tapers into a tail. The short tail curves upward, and slants on the left side of the shell.
I also found that I could segment the spiral (top layers of shell) into four sections, which could be useful when creating the shell with clay.


After exploring the form of my shell, I knew I wanted to place particular emphasis on the proportions of my models. The shell is particularly stout and round, which could be difficult to capture accurately when crafting my models. I knew I would have the most challenges in creating that steep taper from the body towards the tail, as well as the slanted and twisted angles of the top layers. I also knew I would have challenges in deciding the level of abstraction—the shell is extremely textured, how many spikes do I include in my models? do I include any at all?
My Materials
My Subtractive method material is FOAM.
My Additive method material is CLAY.
My Sheet method material is MIXED MEDIA PAPER.

Creating with Clay
Prototype I


I first created a tapered spherical shape as my base form, and then began refining the slopes and curves of the tail. I always kept the original shell side-by-side to my clay model so I could consistently compare and contrast the two.
I then began constructing the top layers of the shell. I found that joining, connecting, and smoothing together different shapes of clay was particularly easy with a flat, chiseled tool.


After constructing the tail and spiral, I completed the foundational form of my shell. Below are the images comparing to the original shell.


I then began refining and adding detail to the shell. I knew I couldn’t, and shouldn’t, add all the spikes and textures of the original shell. However, I identified four large spikes that circle the main body, and added them to my clay shell. I also found that the left side of my clay shell was smaller than the original, and so I added more clay!


Prototype I Final:


Tools I Used the Most
Tools with flat surfaces to push and shape the clay. I especially found the green and chiseled tool helpful when attaching and adding clay.
What to Work On:
- The main body is squatter and more robust—the weight isn’t evenly distributed.
- Maybe consider adding indication of ridges and texture across body—not the individual spikes, but maybe a line down. This can also help communicate the twists and curves of the shell form.
- Make the bottom of the shell too!
Prototype II (incomplete):
I focused a lot more on creating an accurate base body of the shell first, and then plan to add the ridges and more detailed elements later.


Critique on the shell base:
- Pay more attention to the axis of the shell! It appears to curve to the right while my shell model has a central axis.

2. Need to make edits to the top spiral: the slant of the top (from the side view) isn’t as steep. The step down from the top spiral is also a lot more drastic than in my clay model (doesn’t really make sense in writing…).

Revisions…
With the critique notes in mind, I edited the foundation form of the shell body, and then began adding the spikes.


More Revisions…!
At this point, I was quite satisfied with my shell, and unsure if it would be necessary to add the ridges. I decided to add them for now—if I don’t like them later I could just scrape the clay off.
Final Clay Shell


Creating with Paper
Prototype I


I was intimidated in creating the shell through paper because I had no idea how to approach it. I decided that I would construct the external structure of the shell by folding paper into each segment/layer.
I divided the organic form into a geometric form in consideration of the affordances of mixed media paper.
Because I was unsure if my concept would even work, I experimented with printer paper. Although theoretically…my idea should’ve worked, but in reality, it was a lot more difficult to execute (and kind of a fail). I struggled to find what shape to create each segment, the proportions, how big to make each strip, etc.


When I attached the strips together (with tape) I was pleased to find that it actually created a 3D form! The shape is definitely very rough and inaccurate, however, the goal of this exploration was simply to experiment if my concept was feasible.
For the next prototype, I will have to make very detailed measurements and drawings. I also wondered… what if I made the form from one paper cutout instead of multiple strips taped together?
Prototype II:
After rethinking my first prototype, I decided it would be a lot easier—and communicate the volume and form better—to replicate the internal structure of the shell.
Creating Templates in Illustrator
I first created templates in illustrator of the cross-sections by following the natural ridges of the shell.


Creating the Form
For this prototype, I decided to use a cereal box. This proved, however, to be a little too thick; I struggled a lot trying to get the cardboard to fit together. For my next prototype, I will try using mixed media paper.


Prototype II Final:


Critique & Moving Forward:
- On the right track with the form: communicates the form a lot better than the first prototype experiment!
- Make the verticals line up with the ridges of the actual shell.
- Consider adding another vertical, but don’t add too many! Maybe 5 ridges total.
- I plan on abstracting the shapes of the cutouts a lot more—there’s too much detail on the edges (and they look like trees… or the state of West Virginia).
- I also need to focus on making more accurate measurements! Because I knew this wouldn’t be my final, a lot of my slits and notches were guesswork which resulted in a wonky and janky final prototype.
Prototype III:
Because I needed to simplify and abstract my paper cutouts more, I created new templates in Illustrator.


This prototype was a fail because I couldn’t get the slits to fit into each other and the axes/planes wouldn’t align.


Prototype IV:
I realized that my pieces weren’t fitting together because my measurements weren’t accurate. For this prototype, I meticulously measured EVERYTHING (which took 183934¹⁹⁰³ hours), but it finally came together!


My Hectic Video Reflection:
A 1-minute Video updating on what I’m working on:
FINAL SHELL PHOTOS

FINAL CLAY SHELL


FINAL PAPER SHELL


Industrial Form: Computer Mouse
Images of Logitech computer mouse in various perspectives:


Sketches & Explorations


Just like my explorations with the seashell, I began by sketching my computer mouse in various perspectives. I also printed images of my mouse and traced over the form with tracing paper to better understand the curves and tapered shape.
I found that my mouse had a gentle taper that gradually widened for the fingers to rest on. On both sides, the form curves in to form grips for the thumb. While the top surface of the mouse widens as it tapers toward the scroll wheel, the bottom surface narrows.
Creating with Clay
Prototype I
I first created the computer mouse using clay because its forgiving nature; it could also help me better understand the ergonomics of the mouse before using the foam.


To replicate the smoothness of the form, I found that using wide, flat tools, such as a paint palette knife or my plastic-yellow-spatula-clay-tool-thing, were extremely helpful in pressing down and shaping surfaces. I also found that I could compare the heights of my mice by laying a plastic ruler atop the original mouse and my clay model.
Foundation Form of Clay Mouse
Below are images of my clay mouse model at an intermediary step—I finished the base form and was ready to add details such as the thumb grips and scroll bars.


Prototype I Final (incomplete):


The feedback I receive from Daphne & Laura:
- Observe the shadows of the thumbprint to get a more accurate shape, especially bottom left image.
- Raise the edge of the thumbprint.
- Push in edges of front and back of mouse overall form.


Revisions…


Feedback from Q:
- Still can’t quite get that annoying thumbprint down… but almost there!
- Need to fix the shape of the thumbprint too…on top of its curves
- Watch the proportions of the height to the width.
- Watch that ridge next to the thumbprint—there’s no ridge in the original mouse.
- ADD THE SCROLL BARRRR!!!!


And more revisions…


Final Clay Mouse


Creating with Foam
Prototype I
I first sketched out the mouse on all four sides of my foam block. In hindsight, I should have cut my block to match the size of the mouse—I spent a LOT of time hacking away at all the excess material.


I then began cutting away at the foam—first starting with a very rough shape and then slowly shaving it down to the mouse form.


Because I had no blades left in my Olfa Knife, I had to improvise with some of the knives and tools around my house. I mostly used a dollar store box cutter, a fruit knife, clay shaping tools, and my X-Acto blade.


Unfinished Foam Prototype for Crit:


I Continued to Cut…


…and cut…


…and…cut…

……………and ……………………….cut…………….


I definitely underestimated the amount of time carving foam takes. Because I’m scared of making a wrong cut, I made very thin and small shavings, so it feels like I’ve been cutting for forever, but looks like I made no progress. I probably spent six days just cutting this one chunk of foam… and watched through four seasons of Shameless (…40 hours…).
Video Reflection II
One-minute video reflection describing my approach to the hybrid form.

Shoutout to my true fan Tim.
FINAL MOUSE PHOTOS


FINAL CLAY MOUSE


FINAL FOAM MOUSE


Hybrid Form
Combination form of the computer mouse and shell.
Word Association Blender
SHELL: Bulbous | Rounded | Taper | Stout | Spiky | Curves | Asymmetrical/Irregular
MOUSE: Smooth | Ergonomic | Taper | Rounded | Curves | Bulbous | Symmetrical
HYBRID: Bulbous | Curves | Rounded | Asymmetrical/Irregular
Sketches & Explorations
I initially wanted to create a hybrid form that was simple, cohesive, and smooth, similar to the sleek form of the computer mouse. I also wanted it to look very natural, not symmetrical and synthetic like the computer mouse, but curved and unbalanced like the shell form.
I also wanted the form to have strong directionality (like the taper of the mouse and shell), as well as a curved vertical axis and slanted horizontal axis (mimicking the axes of the shell).

I started exploring very fluid and natural forms in my sketchbook… but got kinda bored drawing… so I started making some small sketch models out of clay!


As I was playing around, I created this double-ended tapered form that I liked, and so I scaled it up.
Prototype I


Prototype II
After our class critique of the hybrid forms, I realized I could push the boundaries of my hybrid form a lot more, instead of restricting myself to forms that are similar to my mouse and shell. The only restrictions are the adjectives I chose—I could create any form I wanted to. I began to just play around with the clay.


Prototype III


After messing around with different forms, I realized none of my prototypes aligned with the adjective Bulbous. For my next prototype, I focused a lot more on creating a rounded, thick, and swollen form.
Prototype IV


Adjective Explanation
Bulbous, Curves, Rounded, Irregular/Asymmetrical
I struggled with trying to portray the word Bulbous because I didn’t want my hybrid to simply have a rounded mass in the center identical to my shell and mouse forms. Therefore, I created more of a globular shape with variations in thickness to create a swollen, bloated form with a bulbous tip at the end of the taper. The bloated, blob-like forms are also emphasized by the adjectives curves and rounded—all edges are smooth and the donut-hole in the center highlights the large curve along the bottom. Finally, the word Irregular is demonstrated not only by the uneven thicknesses along the curves, but also the little blob on the right side, creating an asymmetrical form.
FINAL HYBRID PHOTOS


REFLECTION
After spending hours and weeks with my two Covid-19 quarantine buddies, my mouse and shell, I definitely need a break from them. But… I am overall very happy with my final models. Throughout this project, I learned how to observe and analyze complex forms and then transform them into simple yet accurate abstractions. I also learned how to capture realistic and exact proportions, angles, and edges in 3D forms. I definitely had the most fun working with the clay, however, I also enjoyed trying out the foam. Although foam was the most tedious and time-consuming material, I found slowly shaving and carving away at my mouse kind of therapeutic. However, it was also extremely frustrating and nerve-wracking trying to carve every curve accurately and perfectly to make a cohesive and symmetrical final form. I found paper to be pretty difficult to work with because of the intricacies of all of the slots, which needed to be measured to the exact millimeter.
In addition to learning about the affordances of foam, clay, and paper, I also learned about adapting to a new work environment. Because of the pandemic, I definitely miss being in the studio with my design classmates and professors, but I found that I was more focused working on my desk at home. Giving and receiving feedback digitally is, naturally, more difficult, but it forced me to take a lot more detailed pictures of my models so that I could analyze and critique my work myself.